|
Paint Drips 2D |
 Where to find it: (These Nodes are available in the Nodegraph only)

![]() NodeGraph / Right Mouse Click / Add Nodes / Procedural / Extension Pack / Effects
NodeGraph / Right Mouse Click / Add Nodes / Procedural / Extension Pack / Effects
The Paint Drips 2D Node generates procedural, uv-based drip effects. It can be fully animated if required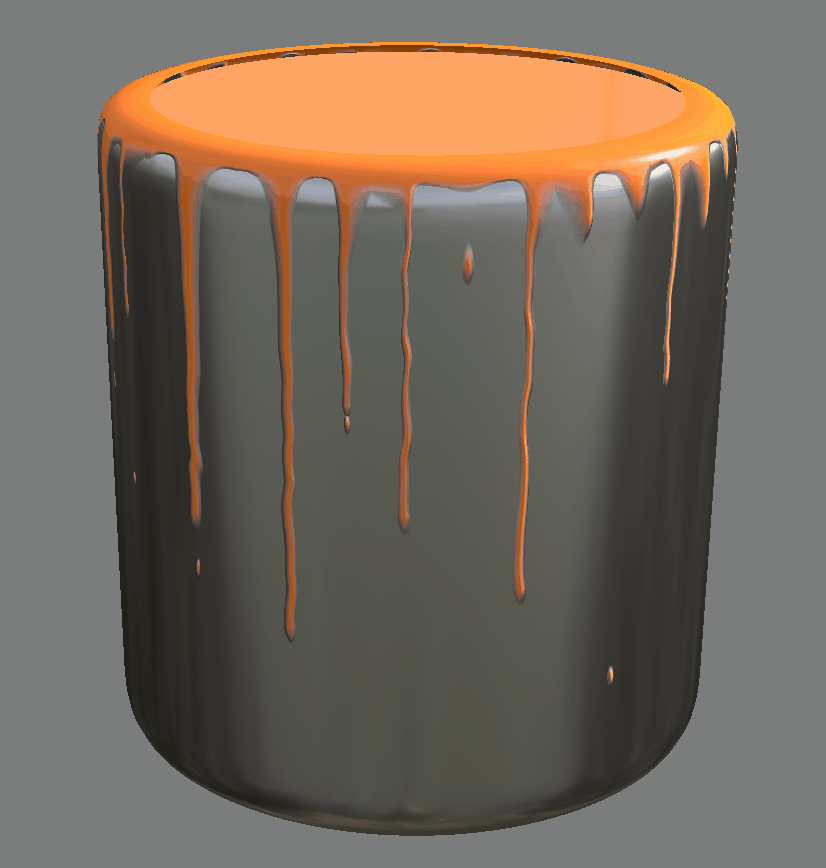
|
Quick Tips |
To animate the Node, simply attach a "Animation" Node to the "Time" Input Port
The "Time" Port overwrites the "Time" Slider with a per-frame value. Control the speed of the animation using the "Time Speed" Slider Value
To preview the animation, right mouse click in an empty area of the Mari UI and activate the "Play Controls" Toolbar
You can set the maximum Frame Range in that Toolbar and preview the drip effect by hitting Play
To export the Animation as an image sequence, attach the Node to a channel and export the channel using for example Extension Pack's Channel Exporter.
Ensure that in your export template the $FRAME variable is specified
By default the node operates on the UVs of your Object. If you wish to convert it to a decal projection (planar projection), cylindrical projection or similar, attach a projection node to the UV Input
You can then freely place the projection in the viewport, for example by selecting the Projection Node and pressing SHIFT+T to activate the Locator Transform in the Viewport (more information)
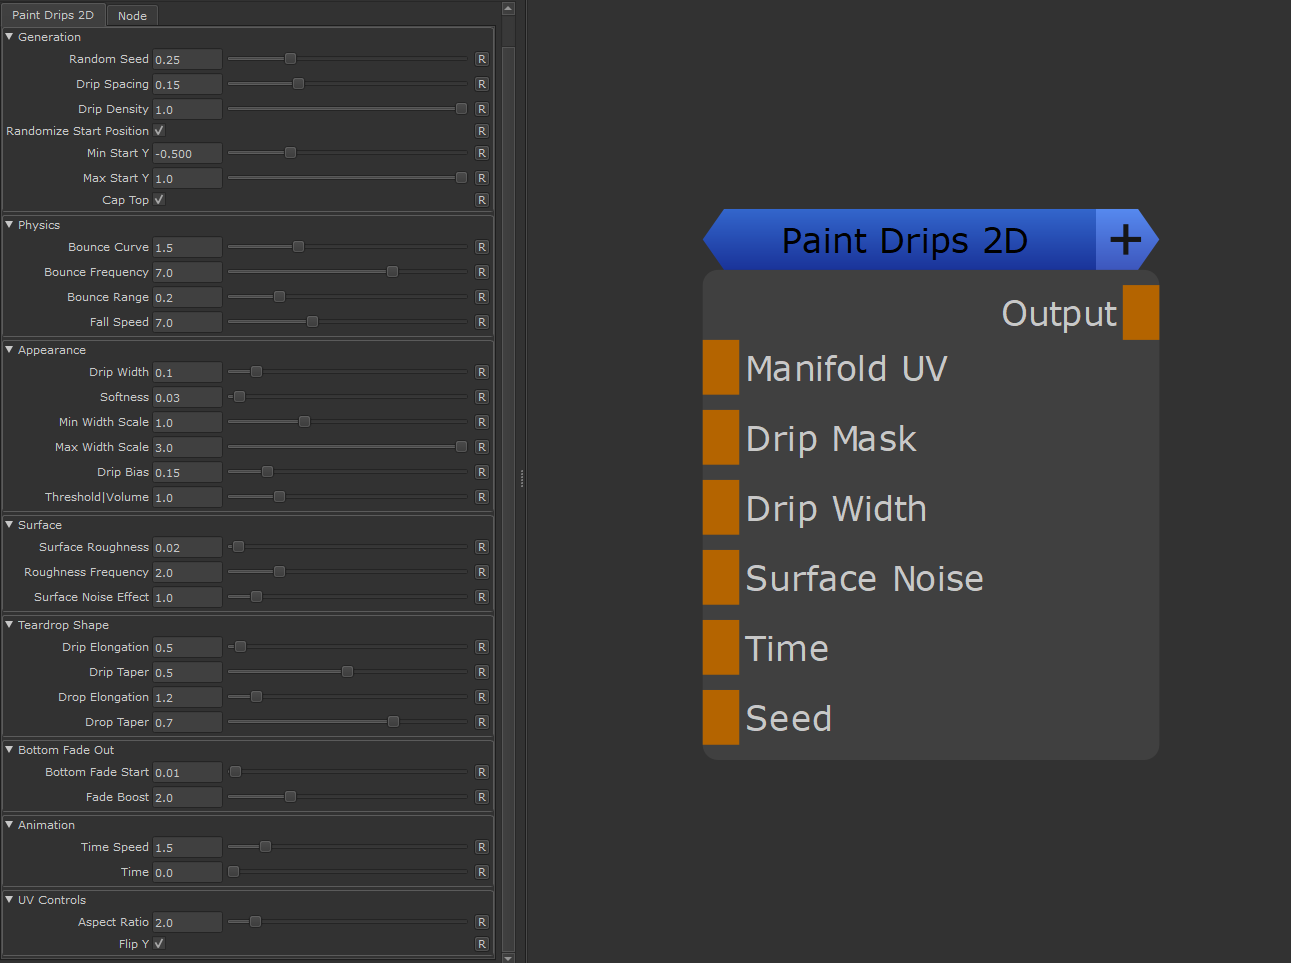
•Manifold UV
Defaults to the UV coordinates of the Object the node is applied to. Allows you to overwrite the UVs with custom Inputs.
Attach for example the UV output of a Projection Node to convert the node to a decal
•Drip Mask
Convenience Mask for the Node. Black hides the effects of the node, white shows it
•Drip Width
Overwrites the drip width slider. Controls the overall thickness of the drips. Larger Values create thicker drips
•Surface Noise
Allows you to supply a surface roughness. Surface roughness will make drips appear less straight and simulate them being nudged into different directions by small surface imperfections.
•Time
Overwrites the Time slider of the Node. Allows you to add a dynamic time variable to have animated drips. Time variables can be fed in by adding a "Animation" Node to the port.
•Seed
Overwrites the Seed slider of the Node. Allows you to randomize the look of the generated drips
•Output
The generated black and white mask of the drips
•Random Seed
Controls the random pattern of drip placement. Change this value to get different drip arrangements while keeping other settings the same.Can be overwritten via a Node Port
•Drip Spacing
Sets how far apart drips are placed horizontally. Lower values create more closely packed drips, higher values spread them out
•Drip Density
Controls how many drips actually appear. 0 means no drips, 1 means maximum drips. Use this to thin out or thicken the drip pattern
•Randomize Start Position
When enabled, drips start at random Y positions across the surface instead of just from the top
•Min Start Y
Minimum Y coordinate where drips can start. Only used when Randomize Start Position is enabled.
•Max Start Y
Maximum Y coordinate where drips can start. Only used when Randomize Start Position is enabled.
•Cap Top
When enabled, drips start from a ceiling
The nodes generates drips. Once the drips reach a certain length they separate into drips and drops. After the separation the drips may "bounce" back to their start position. The Physics section controls the bounce effect and the speed of drops.
Examples of drips separating into drops and bouncing upwards after
•Bounce Curve
Controls how dramatically drips bounce upwards again when a drop separates. Higher values create a stronger bouncing motion when animated.
•Bounce Frequency
Sets how often drops split off drips and cause the drip to bounce. Lower values make drips hang longer before bouncing, higher values make them bounce more frequently
•Bounce Range
Controls how far drips move back when bouncing. Higher values make drips seem more elastic, causing them to snap back higher.
•Fall Speed
Sets how fast drops fall after detaching from a drip. Higher values make drops fall faster, lower values create slower falling motion.
•Drip Width
Controls the overall thickness of the drips. Larger values create thicker drips.Can be overwritten via a Node Port
•Softness
Controls the softness of drip edges. Higher values create more blurred, soft edges while lower values make crisp, hard edges.
•Min Width Scale
Sets the minimum width multiplier for drip variation. Drips will be randomly scaled between this minimum and the maximum width scale
•Max WIdth Scale
Sets the maximum width multiplier for drip variation. Drips will be randomly scaled between this minimum and the maximum width scale
•Drip Bias
Biases the Drip Distance Field. This can be used to taper the start or end of drips
•Threshold/Volume
Lower values clip small values of the distane field resulting in thinner edges, higher values soften the drip boundaries.
•Surface Roughness
Controls how much the surface texture affects drip flow. The surface texture can be added via the Surface Noise Node Port. If none is supplied a basic noise is used.
Higher values make drips follow surface bumps and dips more closely.
•Roughness Frequency
Sets the frequency of surface texture details. Lower values create large, smooth variations while higher values add fine texture detail.
•Surface Noise Effect
Controls how surface noise (supplied via the Surface Noise Port) is applied. 0 = only affects drip position, higher values also affects drip thickness
Example of effect of a perlin noise attached to the surface noise port with varying Drip Roughness Slider Settings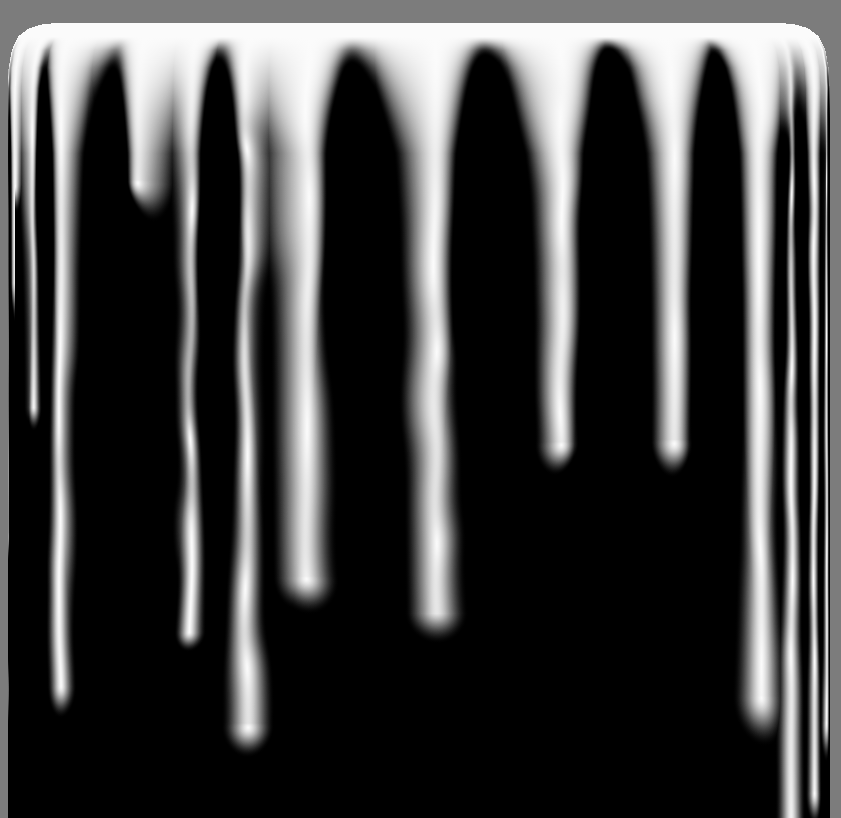
•Drip Elongation
Stretches hanging drips vertically. Higher values make drips more elongated and pointed.
•Drip Taper
Controls how much hanging drips narrow toward the bottom. Higher values create more pronounced points.
•Drop Elongation
Stretches falling drops vertically. Higher values make falling drops more elongated.
•Drop Taper
Controls how much falling drops narrow at the top. Higher values create more pronounced teardrop shapes for falling drops
•Bottom Fade Start
Y coordinate below which drips and drops start to disappear. This can be used to prevent drops to hit bottom uv edges
•Fade Boost
Exponent for the fade strength . Higher values make fade out more aggressiv and less smooth
•Time Speed
Controls the overall speed of the drip animation. Higher values make everything happen faster, lower values slow down the animation.
•Time
Shifts the animation timing. You can map this with a 'animation' node on the corresponding node port to have animated drips
•Aspect Ratio
Adjusts the horizontal scaling of the drip pattern. Bigger values compress drips horizontally into the UV Range, smaller values stretch them.
•Flip Y
Flips the drip pattern vertically, so drips appear from the bottom of the UV Range.