Lesson 1: This isn't Substance Painter |
Many new Mari users, with only experience in Substance Painter, will try and treat Mari like another Substance Painter. . meaning they will layer materials and nodes continuously until after a few (dozen) layering operations their scene performance comes to a grinding halt.
There are some fundamental differences in how Substance Painter and Mari work.
Substance Painter will auto-bake the result of each Layer into an image.
In addition it will auto-bake each group as well as all layers below the currently selected layer.
This means that on the graphics card it doesn't have to evaluate all the complex operations a layer might do (smart masking, noises etc.) but it just sends an optimized stack of images to the GPU that are blended together B over A.
So no matter how complex your layerstack is, by the time it hits the GPU and is shown in painters viewport, it is lightning fast since all the GPU does, is show you a single rendered texture (or one texture per channel of a shader)
Now this is great for a lot of things (small assets are super fast, you can do cool stuff like live blurring etc.) but for VFX assets with sometimes 100 UDIMs the system falls flat, as there is not enough memory available to deal with all those large images on the gpu at once.
As you may know Mari is famous for the fact, that it can handle literally unlimited amount of data. Other than Substance Painter each pixel rendered in the viewport is not a single pixel from a large texture but the result of a chain of math operations.
While there may be the odd paint layer/node where it needs to get a pixel from, it never has to load in all data on the GPU .. always only the pixel it renders (or fragment to be exact - which is a small collection of pixels).
This means that it can load unlimited data without having to worry about the GPU memory not being able to hold it .. since it only ever sends a very small chunk to the GPU.
The downside of this is, that every node in your chain of nodes is always evaluated as part of the pixel rendering .. and this is where your performance eventually collapses if you just keep layering nodes on top of each other.
The amount of math and operations the GPU needs to run per pixel is simply too great for good Viewport FPS
|
|
Video cards have an "instruction limit", meaning simplified they can only run x-amount of lines of code/math per frame they need to draw. In this case the amount of nodes and their math that you are evaluating per pixel is too great |
Lesson 2: Mari Bake Points |
So if a heavy asset can't be done in substance painter due to GPU memory limits - but you can't achieve the same layerstack / nodegraph complexity in mari without having terrible viewport speeds, what can you do ?
The solution are Bake Points.
bake points flatten the nodes that are attached to it, into a set of textures. sounds familiar ? yes, exactly what substance painter is doing.
|
|
|

This means that if you are working on a part of your Nodegraph to the right of a bake point, Mari won't evaluate the nodes before (to the left of ) the bake point anymore and instead use the bake points baked texture.
In the below example viewing the Merge Node will only live evaluate the Oil and Merge Node. The cloud node is disregarded and instead its baked texture result is used. If you view the cloud node itself, you will switch back to a live preview that doesn't rely on baked textures.
If you want to view the entire chain as a live result while viewing the Merge node, you can select the bake point node and deactivate it using CTRL+D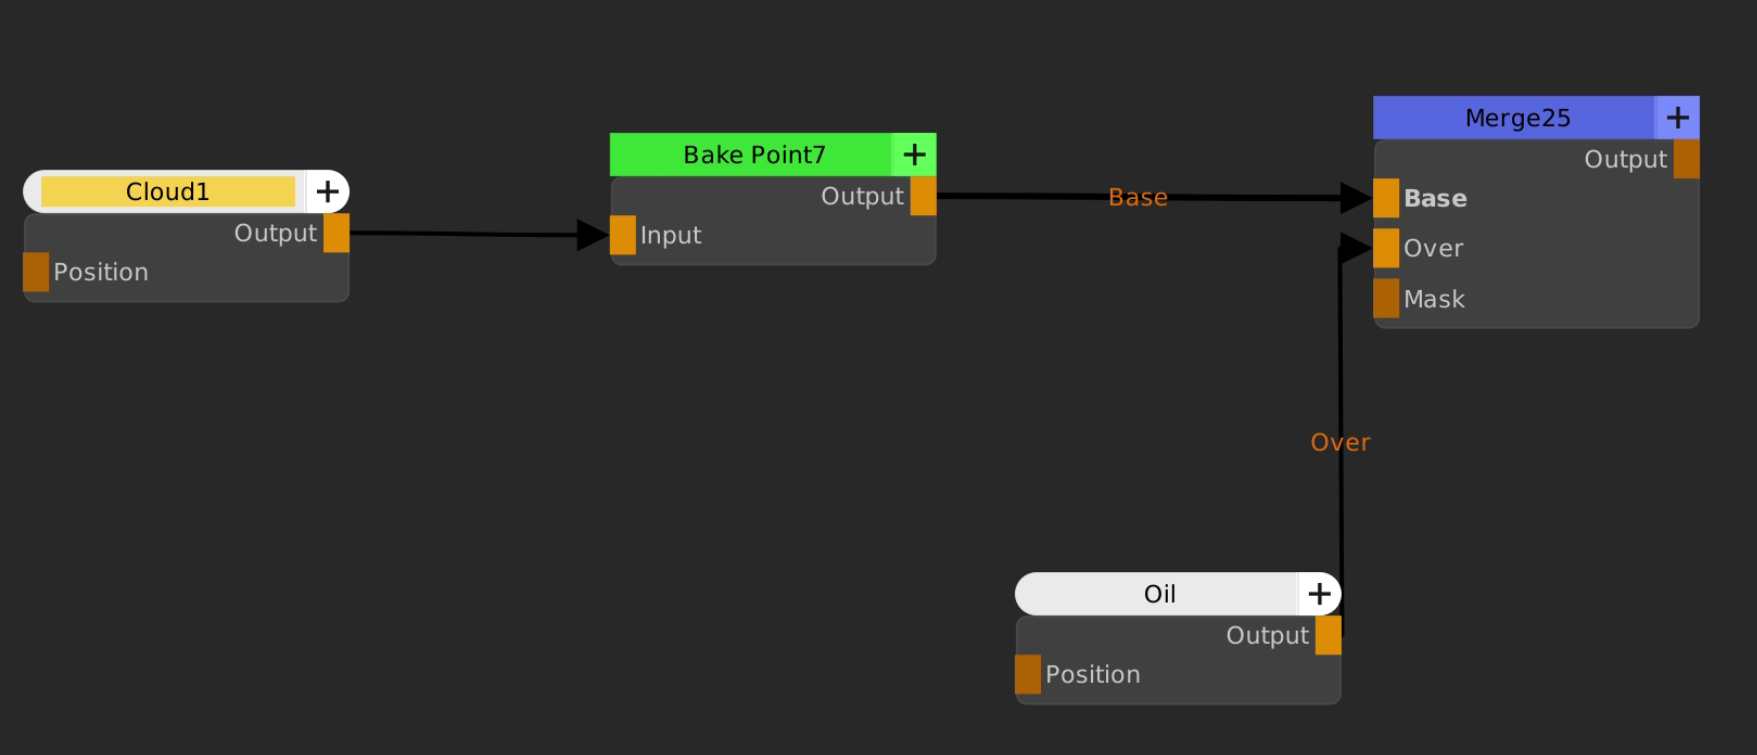
Since many operations such as blurring actually require a baked texture to work with (remember Substance has those baked results for each layer), when using Bake Points the option to non-destructively blur becomes available as well.
Below we are applying a gaussian filter to the baked result via the Filter tab of the Bake Point We can at any time go back and change it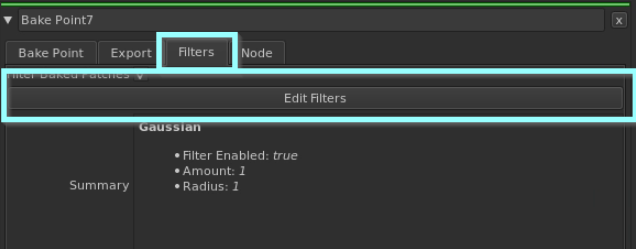
from a pure technical standpoint yes, you could add bakepoints everywhere and the end result would be performance similar to substance painter. but you would be getting yourself into some hot water workflow wise
•Bake Points need to be updated one by one whenever their input (the nodes to the left of a bake point) change so if there are too many it can become tedious.
•Especially on large assets the Mari Project Size can explode (we are talking 100s of Gigabytes on assets with 100s of udims) which brings its own problems of extremely long save times just to name one.
•Bake Point Baking takes some time
So where should you put Bake Points to get the most benefits in performance without turning yourself into a glorified data wrangler, having to update bake points non-stop instead of painting ?
Lesson 3: The Layer Cake Approach |
Most assets adhere to a pretty strict material separation, similar to a cake. There is high complexity within each layer but non-the-less there is a clear separation of materials.

by utilizing a strict separation of materials that interact with each other, effectively "grouping" them we can strategically add very few bake points for maximum effect
If we apply the layer cake to a nodegraph. In the below example we have three containers
1.metal + rust ..
2.brick + mortar
3.dust + dirt (covering both previous containers)
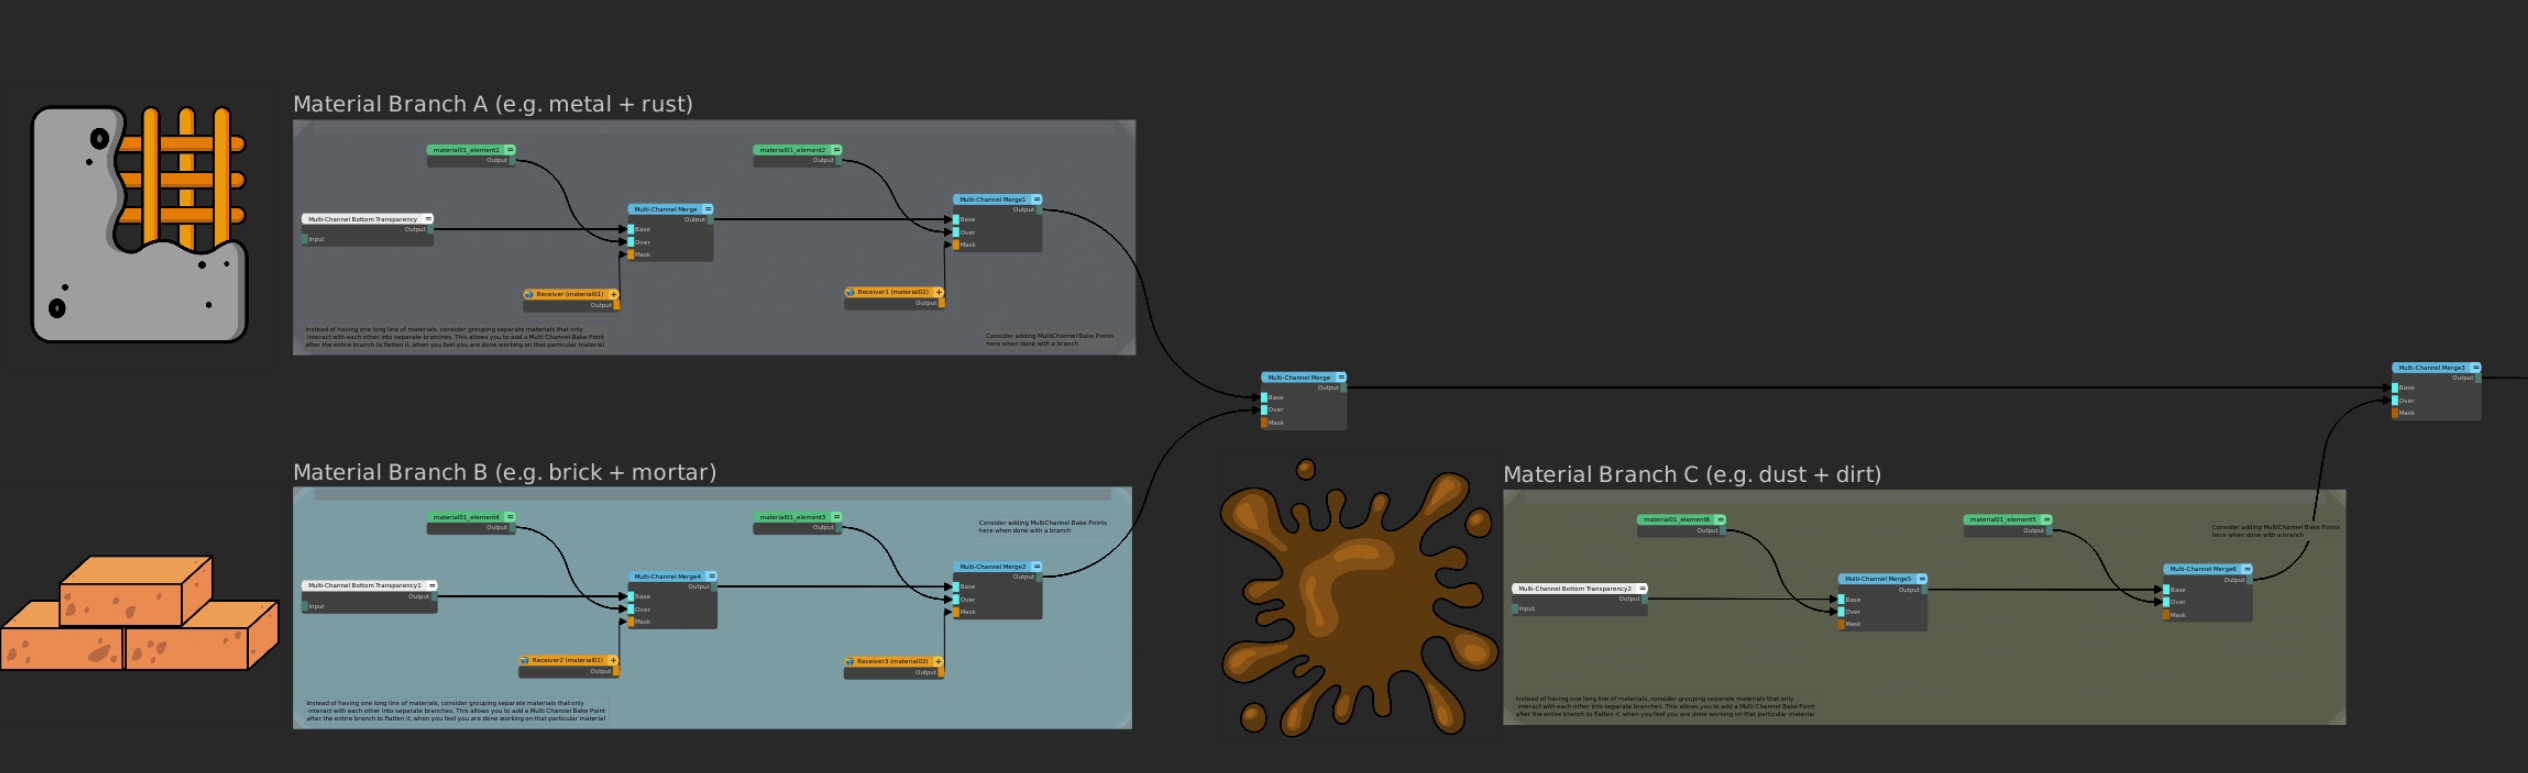
You may notice that we are on purpose adding one extra Merge Node to merge the streams together.
Now let's add some bake points in strategic places
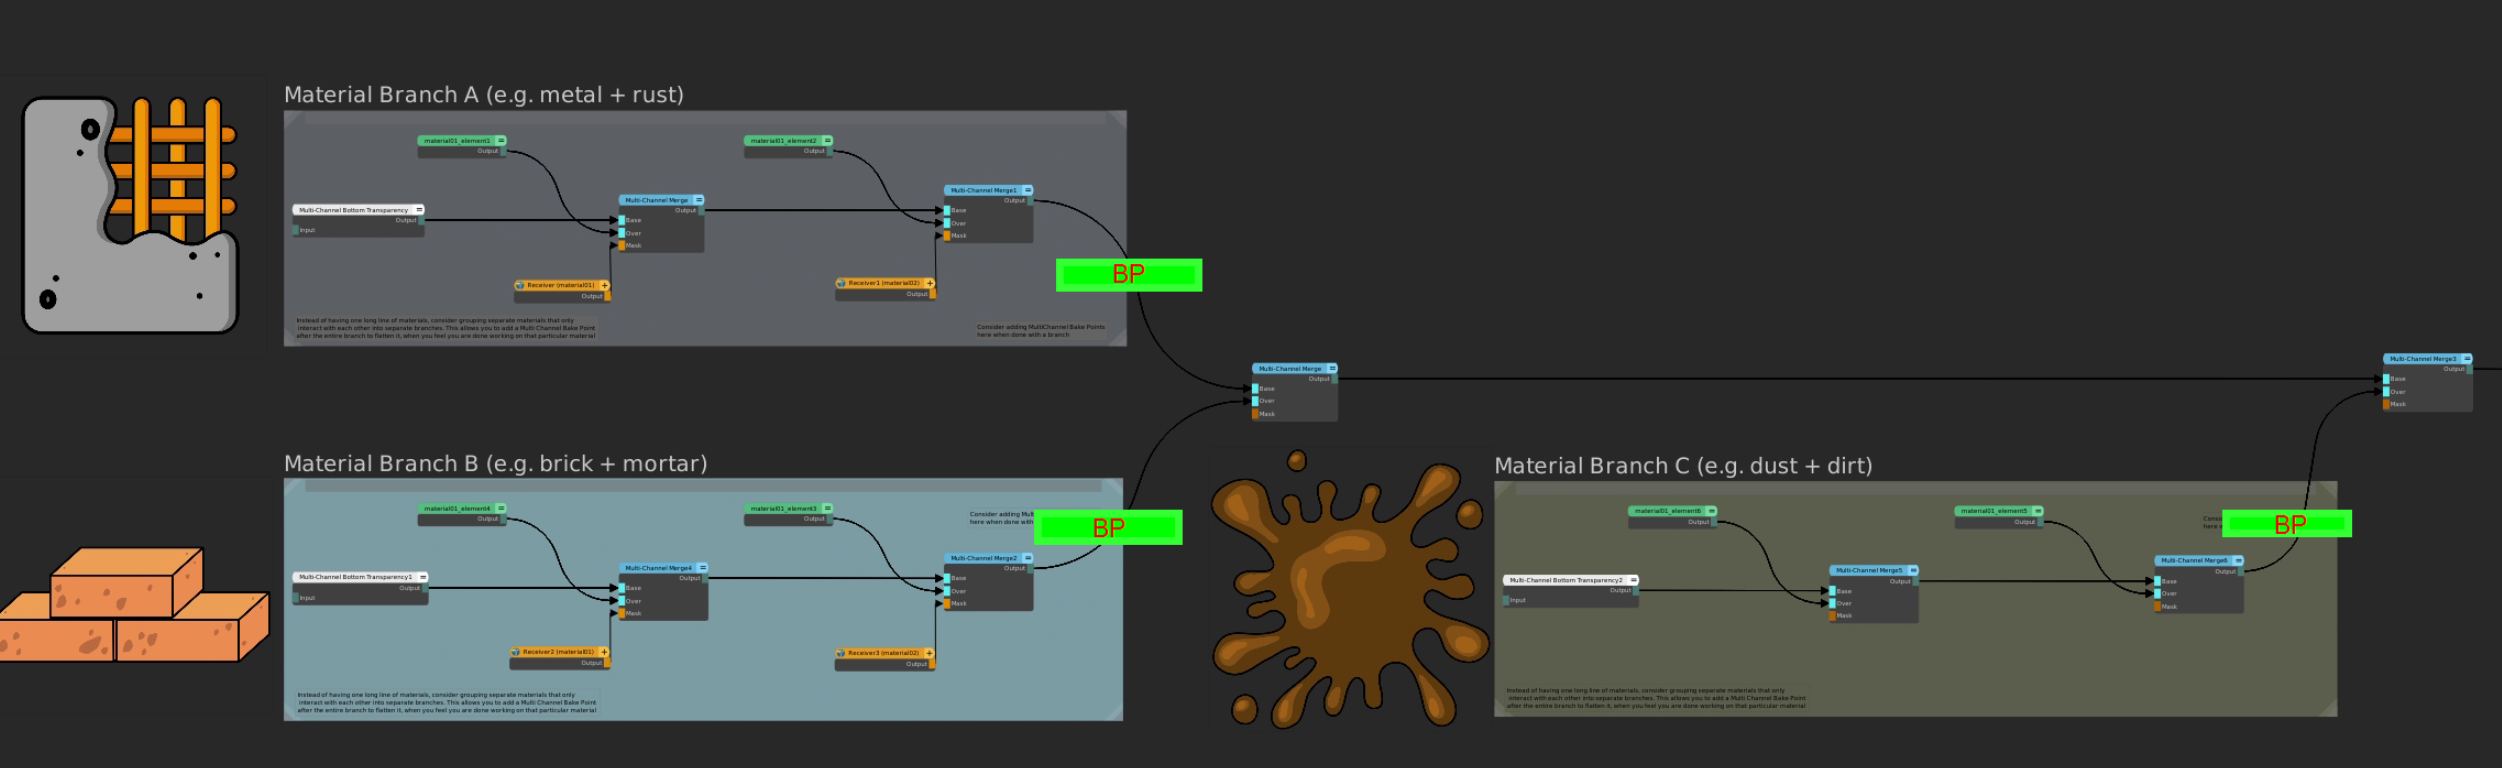
By adding Bake Points after each container but before you layer the container, you maintain full working flexibility & best performance and the least amount of rebakes
•a change to a container will require a rebake of the attached bake point, however only one bake point (or multi Channel Bake Point) will need updating
•changing order of containers will not require any rebakes since the "layering" nodes are live
•You can work on logical materials together (e.g. brick and mortar), viewing them live (e.g. by selecting the last Multi Channel Merge node in container and viewing as Material) without having to worry about bakes.
|
|
Extend this branching methodology to materials inside containers if necessary (e.g. if you need a lot of layering inside a material) |
This approach will greatly improve general working in the Nodegraph.
However there are some exceptions where you may not be able to use the branching approach.
The above approach will serve you well on 80-90% of assets. Houses, Skin, etc all lend themselves to this work approach.
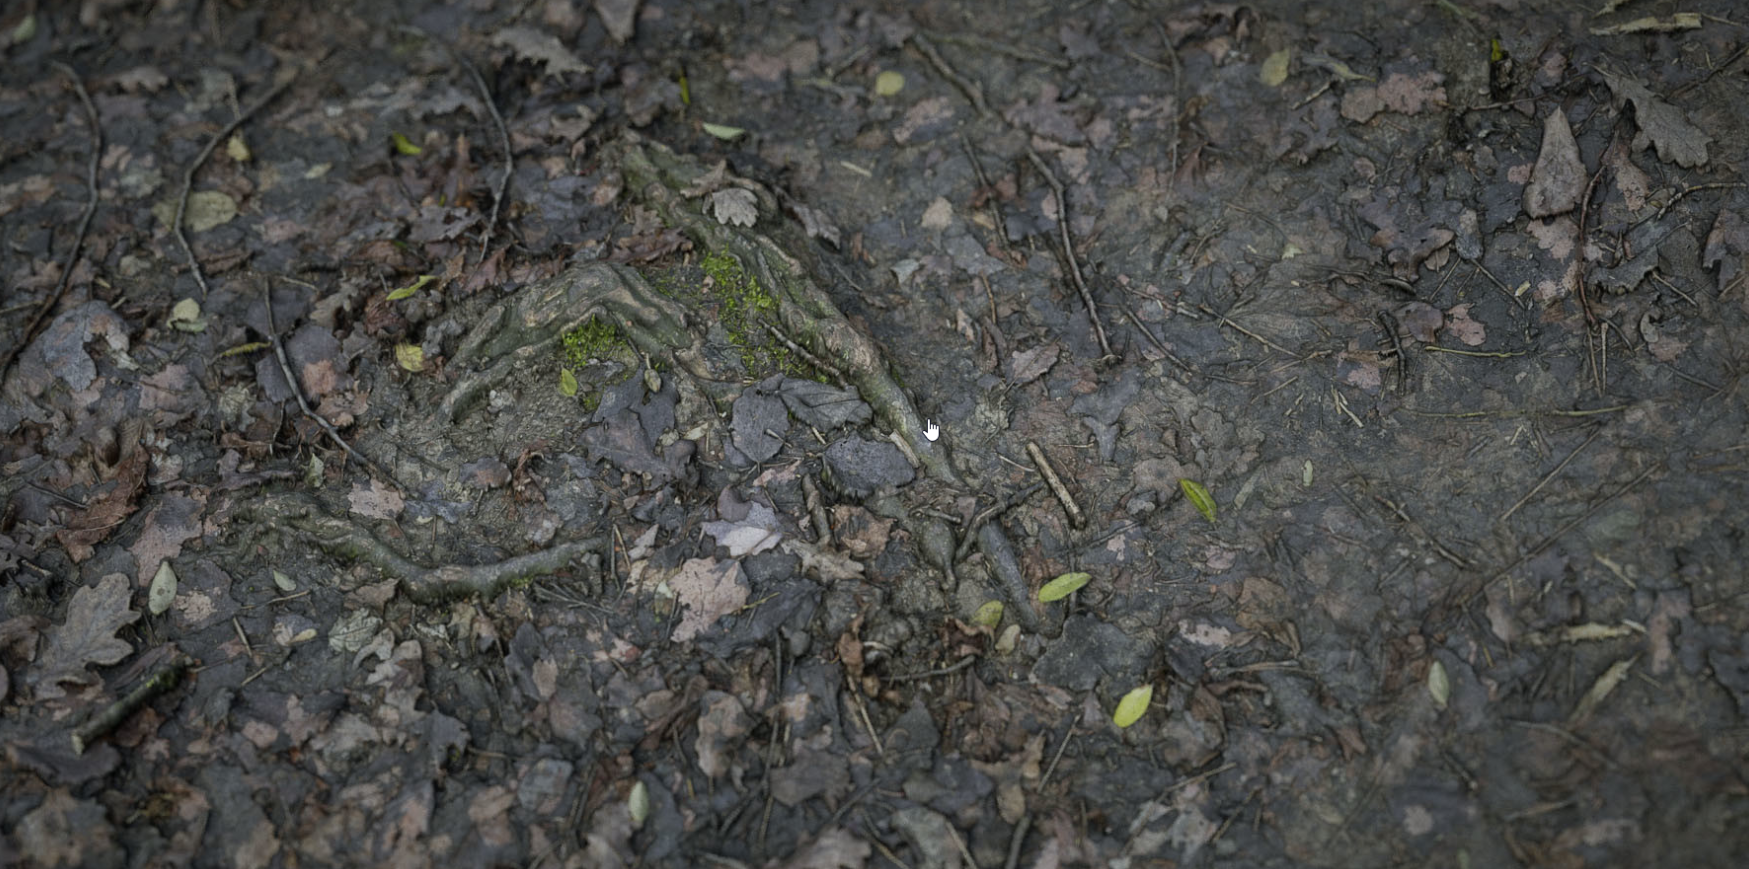
Sticking with the food analogy there are however assets that aren't cake but soup.

"Soup" Assets consist of materials where there is no clear layering and instead, each element of a material is present at all points of the cross section of the overall look.
A good example here would be a forest floor. Where you may have a pretty wild mix of soil, grass, leaves, sticks and stones without any distinct layering. Leaves may be over stones in one spot and under them in another.
While it is still recommended to use at least some branching approaches on those assets, more often than not you will find yourself creating longer chains and the need to share parts of a material to another one, breaking the nice separation that allows for "clean" bake point insertion.
oDuplicate materials if it allows you to use the "Layer cake" approach at least partially
oUse Height Blend Nodes and AB Compare Masks to give the illusion of "soup" effects while being contained in a single branch. Height Blend nodes give already nice natural blending in themselves. Add additional masks to it to further simulate mixing of different material layers
Below is an example of a possible "container layer" for such a "soup". Using only 4 different materials we archive a total of 12 different blend variations.
By adding another height blend on the far right node we could up this to 16. All the while we don't have too many excess nodes and the entire chain when ready can be flattened to a Bake Point.

Lesson 4: Learn your Bake Point Tools |
Mari comes by default with some tools to help you manage bake points better. 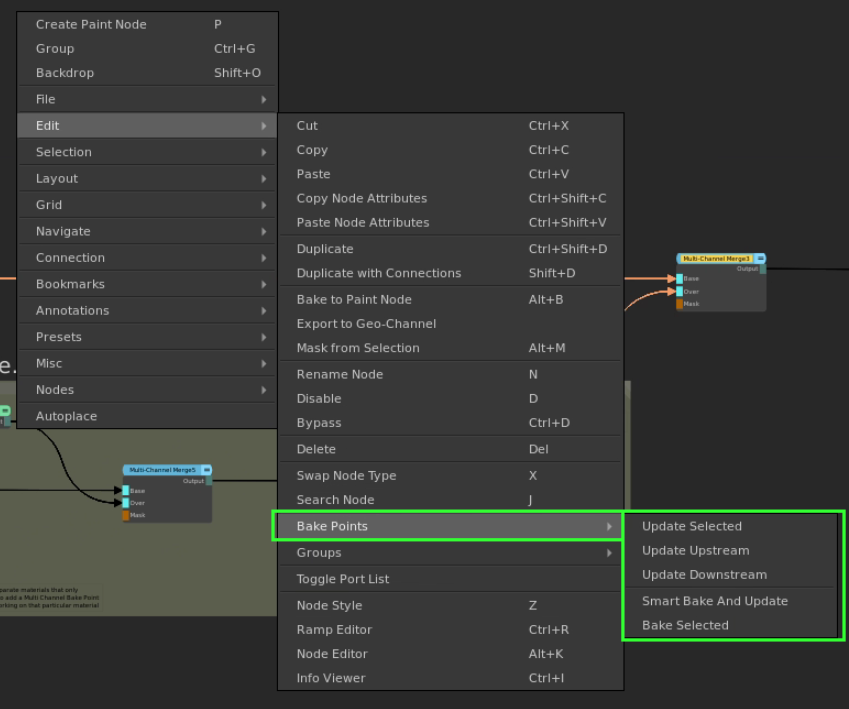
•Smart Bake and Update will be your preferred choice to let Mari automatically handle the updating of all out of date bake points. It will generate a hierarchy of all bake points and update them from the furthest upstream (left) to the furthest downstream (right).
It is even smart enough to figure out bake points that are nested inside Groups and Materials
•For a more directed approach use Update Upstream to bake everything (in a logical order) to the left of your current node selection, or Update Downstream to bake everything to the right.
Let's say you have a brick wall that is part of a house. The house has 50 UDIMs, however the brick wall is only uv'd in UDIMs 1001-1020.
If you have followed the layer cake approach it would make no sense to bake all 50 UDIMs just to bake down the "brick wall" container, wouldn't it ?
Inside Bake Points you can limit the range of UDIMs the Point will bake. Using the button on the far right, you can use selection groups as the source.

This can help removing unnecessary bakes by just baking what you actually know contributes to this bake point.
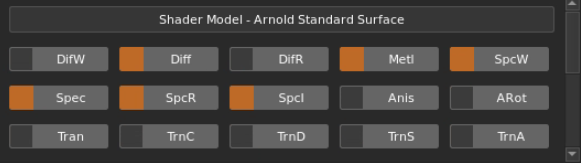
Let's assume you are using an Arnold Shader to preview your work. The Arnold shader has about ~35 different slots that can be mapped.
If you create a Multi Channel Bake Point to bake a material chain, you actually create bake points for all these slots.
So some optimizing can go a long way
The orange boxes indicate which Slots on a Bake Point are active. Disabling unused slots (that don't contribute to the materials) will prevent those from being baked.
There. Already a bunch less:
Furthermore you can drill down into the slots by using the Properties Spreadsheet. You can open this via the Node Properties.

In this spreadsheet you can configure the individual slots of the Bake point. Maybe you don't need to have everything at 4k ?
|
|
Remember, Bake Points are non-destructive. You can at any time change the resolution and rebake |
Lesson 5: The Multi Channel Node Optimizer |
Extension Pack adds Tools to help you optimize your Nodegraph.
The Multi Channel Node Optimizer will remove unnecessary connections improving performance and reducing bake complexity.